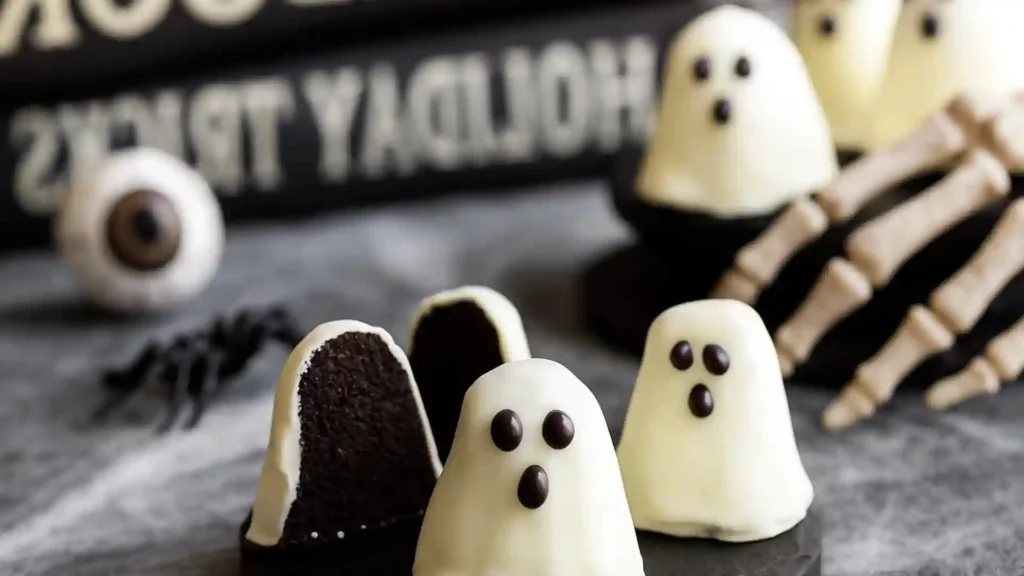
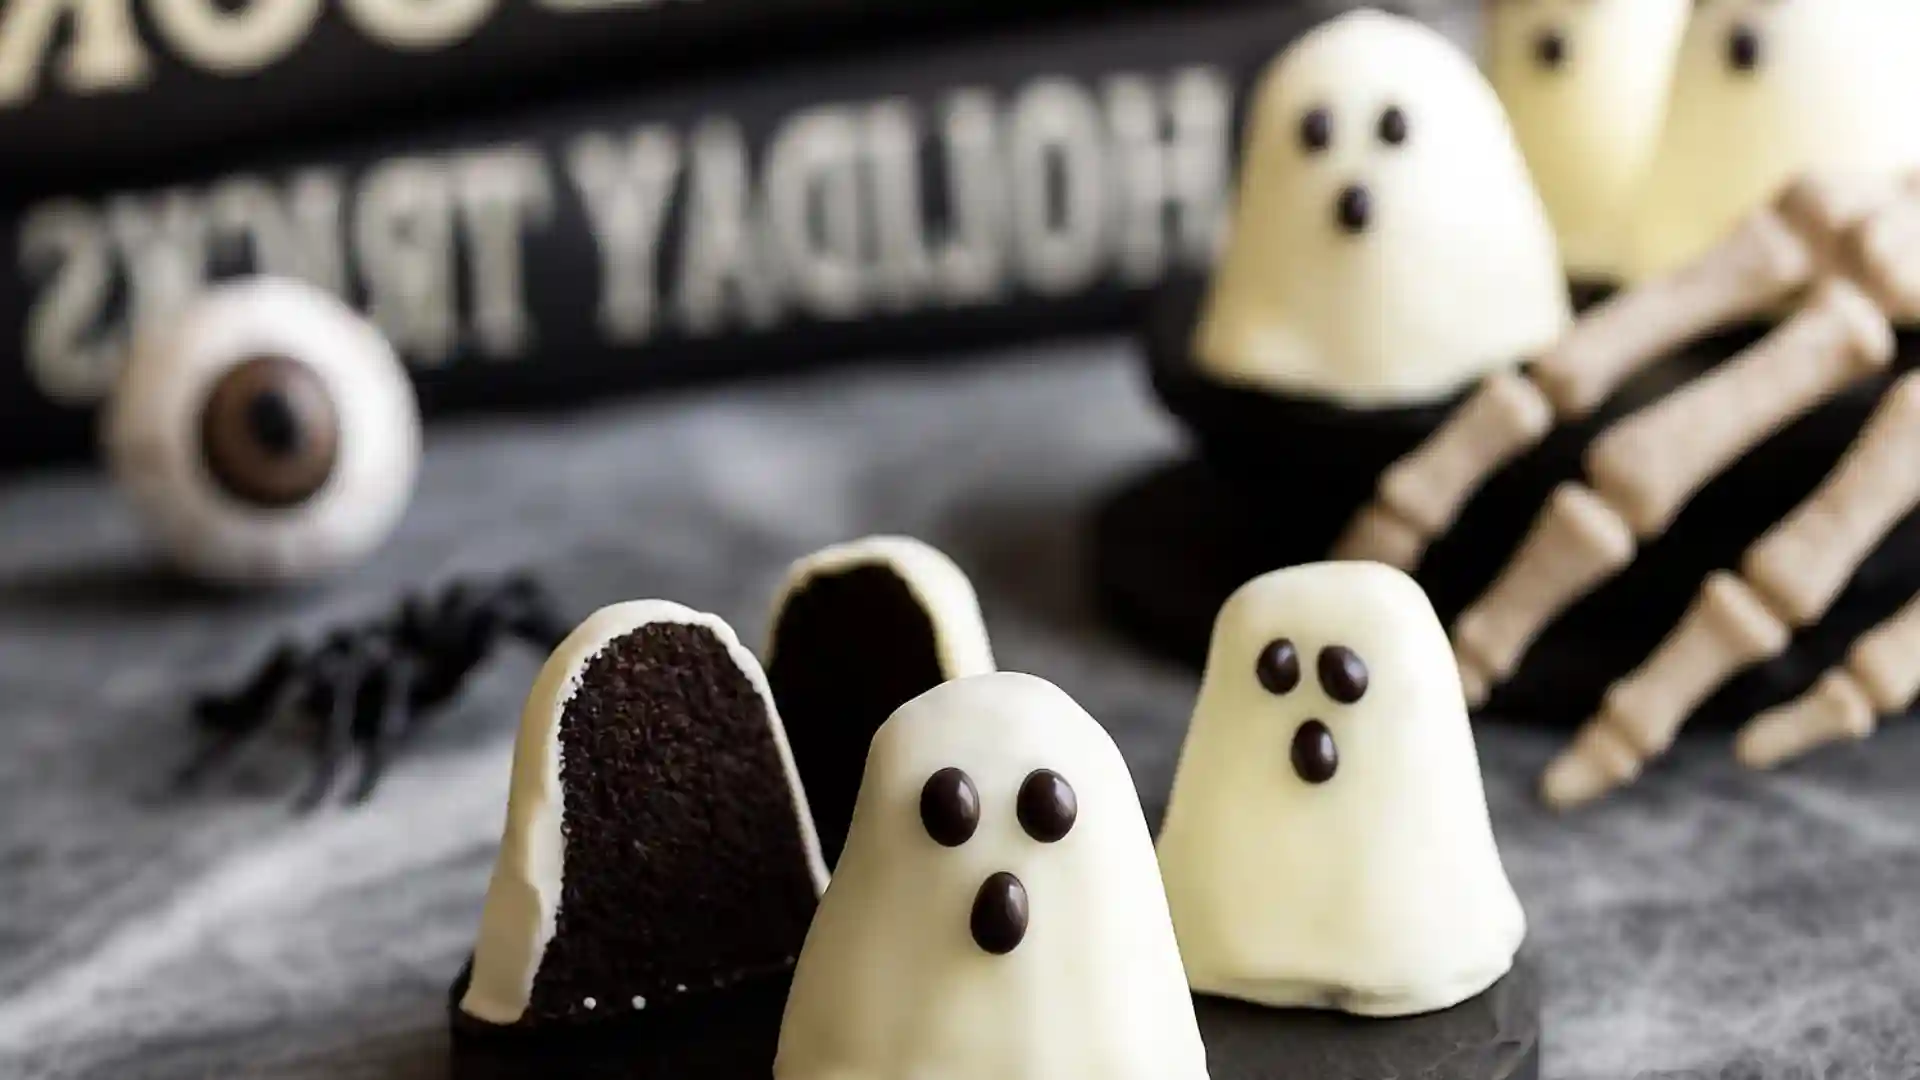
Halloween is more about the treats than the tricks. And if you’re searching for something easy, festive, and guaranteed to disappear fast, these ghost Oreo balls are your new secret weapon.
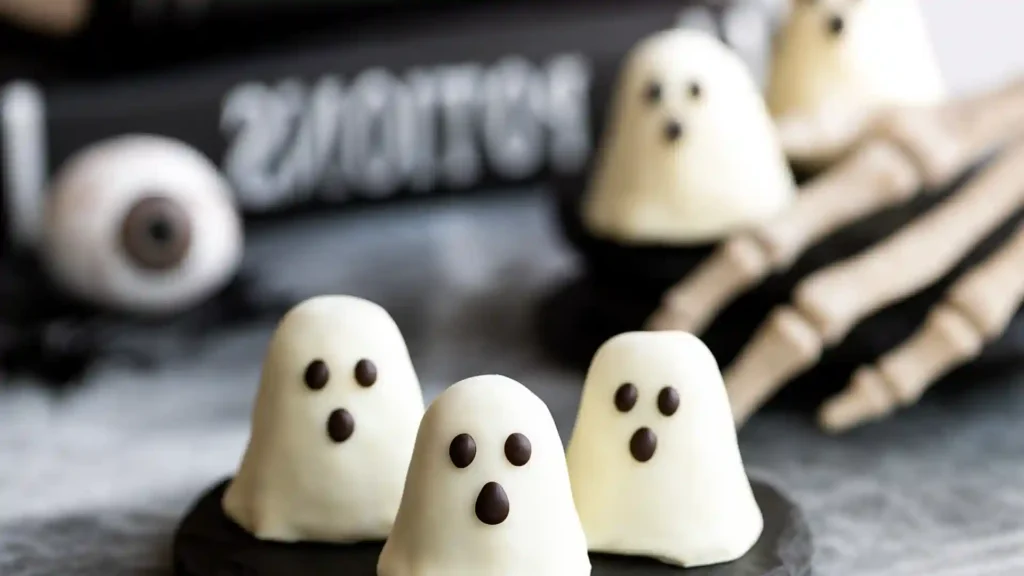
With only four ingredients and zero baking required, they’re a go-to for busy parents, last-minute party planners, or anyone who wants to get into the Halloween spirit without turning the kitchen into a haunted disaster zone. Picture this: creamy, chocolatey truffle centers wrapped in a smooth white chocolate shell, decorated like little ghosts staring up from your party tray. Cute, creepy, and surprisingly craveable.
In this post, I’ll show you how to make them with or without a ghost mold, share a few tricks for keeping them firm and spooky, and even offer some fun variations (think candy eyes, lollipop sticks, or flavor twists). Whether you’re making these with kids or prepping a platter for your next Halloween bash, these ghost Oreo truffles are a hauntingly good addition to your holiday menu.
Table of contents
- Why These Ghost Oreo Balls Are a Halloween Must
- Ingredients You’ll Need (and Easy Swaps)
- Tools That Make Ghost Oreo Balls Even Easier
- How to Make Ghost Oreo Balls (Step-by-Step)
- Tips, Tricks, and Common Pitfalls to Avoid
- How to Serve (and Remix) Your Ghost Oreo Balls
- FAQs
- Other Halloween Recipes:
- Conclusion
Why These Ghost Oreo Balls Are a Halloween Must
If you’ve ever tried making festive treats and ended up with a Pinterest fail, you’re not alone. That’s part of what makes these ghost Oreo balls so satisfying; they’re nearly impossible to mess up. No baking. No complicated ingredients. Just a spooky-cute payoff that looks impressive with minimal effort.
Here’s why they deserve a spot on your Halloween menu:
Only Four Ingredients (No Weird Stuff)
All you need are Oreo cookies, cream cheese, white chocolate, and something black to make faces — either melting wafers or store-bought icing. That’s it. No candy thermometers or specialty baking gear required.
Fun for Kids to Help Make
This recipe is seriously hands-on, and kids love pressing the cookie mixture into molds or shaping ghosts by hand. It’s a great way to keep them entertained while you sneak a few bites of the dough. (No judgment.)
Party-Ready and Crowd-Pleasing
Whether you’re hosting a Halloween bash or just want to drop off something cute for a school party, these little ghost truffles are a guaranteed hit. They hold up well, look adorable on a tray, and have that classic cookies-and-cream flavor nobody ever complains about.
Make-Ahead Friendly
They store beautifully in the fridge or freezer, which means you can prep them ahead of time and focus on everything else your haunted life demands.
Do I need a ghost mold to make these?
Nope! While a silicone ghost mold gives them a super polished look, you can also shape the mixture by hand. Just roll into ovals, flatten the base slightly, and use your fingers or a small tool to pinch the top into a ghost-like shape. Then decorate as usual.
Ingredients You’ll Need (and Easy Swaps)
One of the best things about these ghost Oreo balls is how little you need to make them. But just because the list is short doesn’t mean you’re stuck with one version. Below are the essentials, along with a few smart swaps for those with dietary needs, picky eaters, or those who simply want to get creative.
Base Ingredients (Required)
- 36 Oreo Cookies
Classic chocolate Oreos work best — regular, not Double Stuf. You can also use gluten-free Oreos, Golden Oreos, or even seasonal flavors like pumpkin spice for a twist. - 8 oz Cream Cheese
Use full-fat cream cheese and make sure it’s softened to room temperature. This is the magic glue that holds the crushed cookies together and makes that dreamy truffle texture. - 2 cups White Chocolate Melting Wafers or Almond Bark
These give the ghosts their smooth, ghostly shell. Almond bark is more forgiving for beginners, but wafers melt with a cleaner finish. White chocolate chips work in a pinch but are trickier to melt evenly. - ½ cup Black Melting Wafers or Black Icing
This is how you create the ghost faces. You can use melted wafers piped from a zip-top bag or just grab a tube of pre-made black decorating gel or icing.
Optional Add-ins and Variations
- Candy Eyes – For a more playful or cartoony look.
- Vanilla Extract – Adds a flavor boost to the truffle mixture.
- Gel Food Coloring – Tint the white chocolate if you want pastel ghosts or blood-dripped effects.
- Sprinkles – Add Halloween-themed sprinkles before the white chocolate sets.
- Lollipop Sticks – Turn them into ghost pops for easier serving.
Can I make these dairy-free?
Yes, use a dairy-free cream cheese alternative and make sure your white chocolate is vegan (there are several good brands). The texture may be slightly softer, but it still holds up well if refrigerated.
Tools That Make Ghost Oreo Balls Even Easier
You don’t need a professional kitchen to whip these up, but having the right tools on hand makes things smoother, especially if little helpers are involved.
Here’s what you’ll want within reach:
Essentials
- Food Processor (or a Zip Bag + Rolling Pin)
A food processor makes crushing Oreos a breeze. No processor? No problem — just toss them in a sealed zip-top bag and go to town with a rolling pin or heavy-bottomed glass. - Mixing Bowl + Spoon or Spatula
You’ll need something sturdy to mix the cookie crumbs with the cream cheese. A silicone spatula works great for scraping down the sides. - Ghost-Shaped Silicone Mold (Optional)
This is what gives the truffles their crisp, ghostly form. Look for flexible silicone molds so the ghosts pop out easily. But don’t stress — if you don’t have one, hand-shaping works too. - Microwave-Safe Bowl
For melting your white chocolate or almond bark. A glass measuring cup with a pour spout is ideal. - Piping Bag or Zip Bag with the Tip Snipped Off
Makes decorating easier (especially if you’re using melted black wafers for the ghost faces). - Baking Sheet + Parchment Paper
For placing your dipped ghosts as they set. Parchment prevents sticking and makes cleanup easy.
Optional But Helpful
- Candy Thermometer (only if you’re particular about melting temps)
Not required, but helpful if you’re picky about chocolate consistency. - Offset Spatula or Small Spreader
To help smooth out the chocolate if needed or move the ghosts once coated.
How to Make Ghost Oreo Balls (Step-by-Step)
No baking. No candy thermometers. Just a few simple steps between you and these spooky-cute ghost treats. Whether you’re using a mold or shaping by hand, the process is fun, forgiving, and surprisingly fast.
Here’s exactly how to do it:
Step 1: Crush the Oreos
Toss 36 Oreo cookies into a food processor and pulse until you get fine, sandy crumbs. If you’re doing it by hand, seal them in a plastic zip-top bag and crush with a rolling pin or the bottom of a jar. No chunks the smoother the crumb, the better the texture.
Step 2: Mix with Cream Cheese
In a large bowl, combine the cookie crumbs with 8 oz of softened cream cheese. Mix until fully incorporated. It should resemble a thick, doughy paste. You can use a spoon, spatula, or clean hands (the kids love this part).
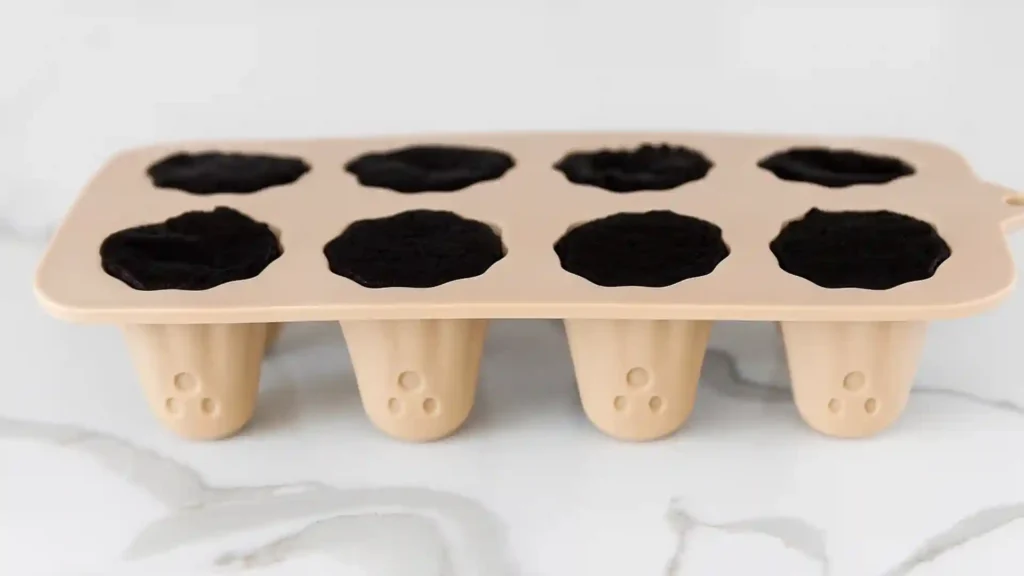
Step 3: Shape the Ghosts
Using a mold: Firmly press 1–2 tablespoons of the mixture into each cavity of your ghost mold. Level the backs with a spatula or your fingers.
No mold? Scoop out portions and hand-shape into ovals. Flatten the bottoms so they stand, then gently pinch the tops to form a ghostly peak.
Step 4: Chill Until Firm
Place the shaped ghosts in the fridge for at least 1 hour, or speed things up with 20 minutes in the freezer. This helps them hold their shape during dipping.
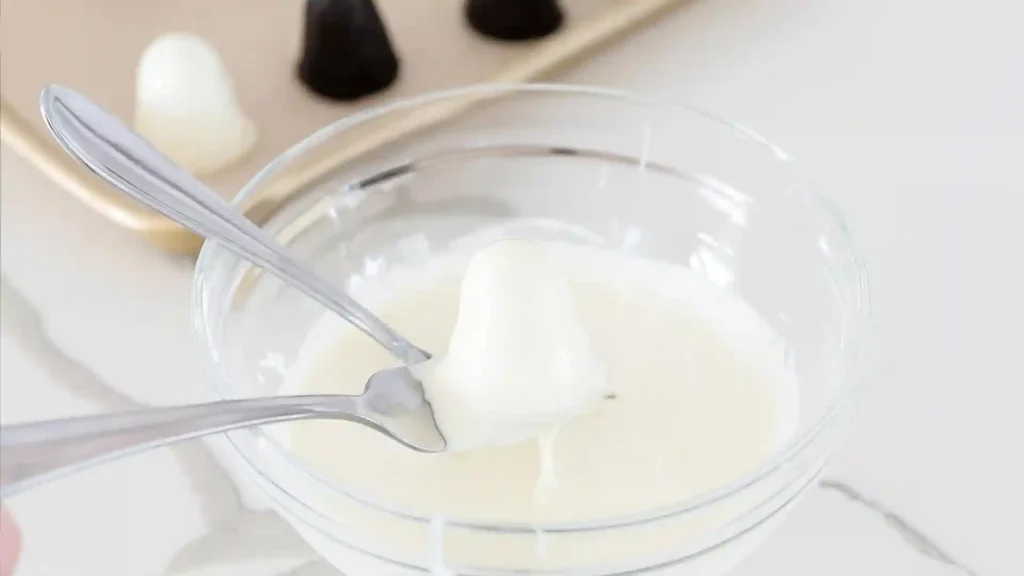
Step 5: Dip in White Chocolate
Melt 2 cups of white chocolate melting wafers or almond bark according to package directions. Carefully remove the ghosts from the mold and dip them one by one, letting excess drip off before placing them on a parchment-lined tray.
Tip: Use a fork to lift and tap the ghost gently on the side of the bowl to remove excess coating.
Step 6: Decorate the Faces
Once the white chocolate has set slightly (about 10–15 minutes in the fridge), pipe eyes and mouths onto each ghost using black icing or melted black wafers. Let them chill again until fully set.
Step 7: Store
Keep the finished ghost Oreo balls in the refrigerator in an airtight container. They’ll stay firm and delicious for up to a week or freeze them for up to 2 months.
Can I dip them without a fork?
Yes, if dipping’s a mess, you can also spoon the melted chocolate over the ghosts while they sit on parchment. It’s not as smooth, but it gets the job done and still looks festive.
Tips, Tricks, and Common Pitfalls to Avoid
While ghost Oreo balls are pretty forgiving, a few clever tricks (and warnings) can make the difference between “Pinterest-perfect” and “what-is-that-on-the-plate?”
Let’s troubleshoot before trouble shows up.
Pro Tips for Best Results
- Soften cream cheese — but not too much
You want it spreadable, not runny. If it’s overly soft, your truffle mixture can get gloopy. Let it sit at room temperature for about 15–20 minutes. - Chill before dipping — seriously
If the mixture is too soft when you dip, the ghosts may fall apart or melt slightly in the chocolate. Cold = clean dip. - Use quality melting wafers or almond bark
Some white chocolates seize or get chalky. Melting wafers or almond bark (like Ghirardelli or Merckens) melts smoothly and hardens beautifully. - Pipe faces after the coating sets
Don’t rush this. If you add faces while the coating is still soft, the features might slide or smear.
Common Mistakes (and How to Fix Them)
- Mixture too sticky or wet?
Add a few extra crushed cookies to firm it up. Chill longer before shaping. - Can’t get ghosts out of the mold?
Freeze for 5–10 minutes, then gently pop them out by pressing the back of the silicone. If needed, use a toothpick to help lift. - White chocolate won’t melt smoothly?
Add a tiny bit of coconut oil or shortening (½ tsp at a time) and stir slowly. - Chocolate coating cracking?
This usually happens if the truffles are too cold and the chocolate is too hot. Let the ghosts warm up slightly before dipping.
How to Serve (and Remix) Your Ghost Oreo Balls
Sure, these ghost Oreo balls are cute enough to stand alone, but why not turn them into the life (or afterlife?) of the Halloween party? Whether you’re styling a dessert board or switching up flavors, there are plenty of ways to keep these spooky sweets fun and fresh.
How to Serve Them at a Halloween Party
- On a Spooky Dessert Platter
Pair the ghosts with other Halloween treats like candy corn, monster cupcakes, or chocolate-dipped pretzel sticks. Add plastic spiders or a layer of crushed cookies to mimic dirt for an eerie graveyard effect. - Turn Them Into Ghost Pops
Insert small lollipop sticks into the base before dipping in white chocolate. Let them sit upright in a foam block or mug for a ghostly lollipop-style presentation, great for kids or trick-or-treat party favors. - Add to Lunchboxes or Treat Bags
Wrap individually in small cellophane bags and tie with orange or black ribbon. A sweet surprise that’s classroom-safe (and doesn’t melt too easily).
Fun Variations to Try
- Flavor Twists
Use flavored Oreos like peppermint, pumpkin spice, or peanut butter to match your Halloween mood. Each one gives the ghosts a unique personality. - Add Texture Inside
Fold in crushed pretzels, toffee bits, or chopped nuts to the filling for a surprise crunch. - Glow-in-the-Dark Ghosts
Use edible glitter or glow dust on the white chocolate before it sets. It won’t actually glow, but it looks like it might. - “Bloody” Ghosts
Drizzle with red-colored chocolate or strawberry syrup for a creepier, horror-movie vibe. Bonus points for a few candy “fangs.”
FAQs
Can I use a different type of cookie instead of Oreos?
Yes, Graham crackers, Biscoff cookies, or chocolate sandwich cookies without cream can work. You may need to adjust the cream cheese slightly since different cookies absorb moisture differently.
What if I don’t have cream cheese?
You can try using mascarpone or a thick vegan cream cheese substitute. Just avoid yogurt or sour cream, they’re too runny and won’t hold the mixture together well.
How long do ghost Oreo balls last in the fridge?
They’ll stay fresh for about 5 to 7 days when stored in an airtight container. For the best texture, keep them cold until ready to serve.
Can I freeze these?
Absolutely. Flash-freeze on a tray first, then transfer to a zip-top bag or freezer-safe container. They’ll keep for up to 2 months. Thaw in the fridge for several hours before serving.
My chocolate coating is streaky. What went wrong?
Streaks usually mean moisture or temperature issues. Make sure tools are completely dry and avoid overheating the chocolate. Stir slowly and don’t rush the melting process.
Other Halloween Recipes:
Ghost Oreo Balls
Ingredients
Equipment
Method
- Crush Oreo cookies in a food processor or in a zip-top bag using a rolling pin until fine crumbs form.
- Mix cookie crumbs with softened cream cheese until fully combined and a dough-like texture forms.
- Firmly press the mixture into a ghost-shaped silicone mold or shape by hand into ovals. Flatten the bottoms and pinch the tops for a ghostly silhouette.
- Refrigerate for 1 hour or freeze for 20 minutes until firm.
- Melt white chocolate wafers in a microwave-safe bowl according to package instructions.
- Dip the chilled ghosts into melted white chocolate, letting excess drip off. Place on a parchment-lined baking sheet.
- Once the coating has set, pipe black faces onto each ghost using icing or melted black wafers.
- Refrigerate until fully set. Store in an airtight container in the fridge or freezer.
Notes
Looking for more cooking and baking inspiration? Browse our Pinterest boards or join the conversation with us on Facebook.
Conclusion
Whether you’re prepping for a class party, a cozy night in, or a Halloween bash with a dessert table straight out of Pinterest, these ghost Oreo balls bring just the right mix of cute, creepy, and crazy delicious.
They’re quick. They’re customizable. And honestly? They disappear faster than candy on trick-or-treat night.
So go ahead, bookmark this one, print it out, or better yet, make it a tradition. Get the kids involved, try a flavor twist, or share your own spooky spin on social media. If you do, tag me, I’d love to see your haunted creations.
And if you’ve got a friend who’s always scrambling for last-minute Halloween recipes? Send this their way. Because the only thing better than a good Halloween treat… is already in the fridge waiting for you.