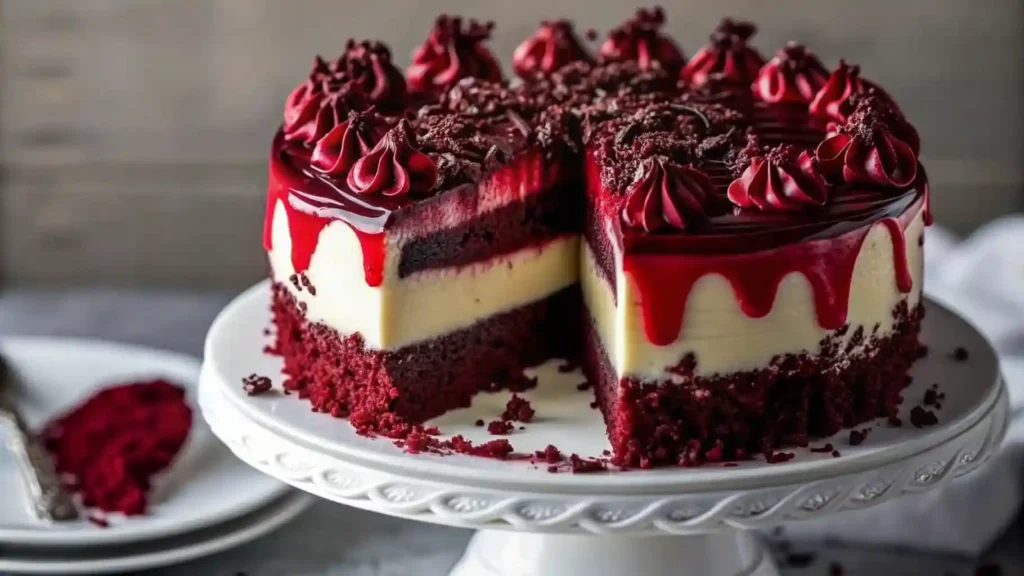
When my sister announced her engagement last spring, I knew I wanted to create something truly special for her bridal shower that would leave everyone speechless. This Red Velvet Cheesecake Layer Cake became that showstopper, combining the rich, velvety texture of classic red velvet with a creamy cheesecake layer right in the middle. The moment I brought it out, cameras started flashing and guests gathered around just to admire the dramatic red layers peeking through the white cream cheese frosting. Every component works together beautifully, from the optional chocolate cookie crust that adds delightful crunch to the glossy red berry glaze that drips enticingly down the sides. This isn’t just a cake; it’s an experience that turns any gathering into a celebration worth remembering. The best part is that despite looking incredibly complex and bakery-worthy, the recipe breaks down into manageable steps that even intermediate bakers can master with confidence.
What Makes This Cake Extraordinary
Most layer cakes stick to a single flavor profile, but this recipe combines two beloved desserts into one spectacular creation. The red velvet layers provide that signature tender crumb with subtle cocoa flavor and gorgeous color, while the cheesecake layer adds rich creaminess that cuts through the sweetness perfectly. That cream cheese frosting ties everything together with tangy smoothness that complements both the cake and cheesecake components. The optional chocolate cookie crust adds textural contrast that makes each bite more interesting, and the berry glaze brings a fruity brightness that balances the richness. This combination creates layers of flavor and texture that keep you coming back for just one more bite.
Ingredients You Need
Gather these components for each layer of this impressive cake:
For the Chocolate Cookie Crust (Optional)
- 2 cups chocolate cookie crumbs, filling removed
- 1/2 cup unsalted butter, melted
For the Red Velvet Cake Layers
- 2 1/2 cups all-purpose flour
- 1 1/2 cups granulated sugar
- 2 tablespoons cocoa powder
- 1 teaspoon baking soda
- 1 teaspoon baking powder
- 1 teaspoon salt
- 1 1/2 cups buttermilk or milk with 1 tablespoon vinegar
- 1 cup vegetable oil
- 2 large eggs
- 2 teaspoons vanilla extract
- 1 teaspoon white vinegar
- 1 to 2 tablespoons red gel food coloring
For the Cheesecake Layer
- 16 ounces cream cheese, softened to room temperature
- 1/2 cup granulated sugar
- 2 large eggs
- 1 teaspoon vanilla extract
- 1/2 cup sour cream or heavy cream
For the Cream Cheese Frosting
- 16 ounces cream cheese, softened
- 1 cup unsalted butter, softened
- 4 cups powdered sugar
- 2 teaspoons vanilla extract
For the Red Berry Glaze
- 1/2 cup strawberry or raspberry jam
- 2 tablespoons water
- 1 teaspoon lemon juice
For Decoration
- Red velvet crumbs from cake trimming
- Dark chocolate chips
- Extra frosting for piping decorations
Making Red Velvet Cheesecake Layer Cake
Begin with the optional chocolate cookie crust by mixing the cookie crumbs with melted butter until the mixture resembles wet sand that holds together when pressed. Press this mixture evenly into the bottom of a 9-inch springform pan, making sure there are no gaps or thin spots. Bake the crust at 350 degrees Fahrenheit for 10 minutes to set it firmly, then remove it from the oven and allow it to cool completely before adding the cheesecake batter. This crust adds wonderful texture and a chocolatey base that complements both the red velvet and cheesecake layers beautifully.
For the red velvet cake layers, preheat your oven to 350 degrees Fahrenheit and prepare two 9-inch round cake pans by greasing them thoroughly and lining the bottoms with parchment paper. In a large bowl, whisk together the flour, cocoa powder, baking soda, baking powder, and salt until everything is evenly distributed. In a separate bowl, blend the sugar, vegetable oil, eggs, buttermilk, white vinegar, vanilla extract, and red gel food coloring until completely smooth and vibrant red. Gradually combine the wet ingredients with the dry ingredients, mixing gently just until smooth to avoid overmixing which can make the cake tough. Divide the batter evenly between your prepared pans and bake for 25 to 30 minutes, checking with a toothpick that should come out clean when inserted in the center. Let the cake layers cool in the pans for 10 minutes before turning them out onto wire racks to cool completely.
Make the cheesecake layer by beating the softened cream cheese and sugar together in a medium bowl until the mixture is silky smooth with no lumps remaining. Add the eggs one at a time, beating well after each addition to fully incorporate them before adding the next one. Mix in the vanilla extract and sour cream or heavy cream until everything is completely combined and the batter is smooth and creamy. Pour this cheesecake mixture over your cooled cookie crust in the springform pan, or into a prepared pan if you’re skipping the crust. Bake at 325 degrees Fahrenheit for 40 to 45 minutes, just until the cheesecake is set around the edges but still has a slight jiggle in the very center. This jiggle is important because the cheesecake will continue to set as it cools, and overbaking leads to cracks and dry texture. Allow the cheesecake to cool fully at room temperature, then refrigerate it for at least 4 hours or overnight until completely cold and firm.
While the cheesecake chills, prepare your cream cheese frosting by beating the softened cream cheese and butter together until light and fluffy, about 3 to 4 minutes on medium speed. Gradually add the powdered sugar one cup at a time, beating well after each addition, then mix in the vanilla extract. Continue beating until the frosting is smooth, creamy, and holds its shape perfectly for spreading and piping. If the frosting seems too soft, refrigerate it for 15 to 20 minutes to firm up slightly before using.
To assemble your Red Velvet Cheesecake Layer Cake, place one red velvet cake layer on your serving plate or cake stand and spread a thin layer of cream cheese frosting across the top to create a crumb coat and help everything stick together. Carefully remove the chilled cheesecake from the springform pan and place it on top of the frosted cake layer. Spread another thin layer of frosting on top of the cheesecake to help the final cake layer adhere properly. Gently place the second red velvet cake layer on top, then frost the entire assembled cake with the remaining cream cheese frosting, smoothing the sides and top as evenly as possible. For the cleanest finish, apply a thin crumb coat first, refrigerate the cake for 30 minutes, then apply the final layer of frosting.
Create the red berry glaze by warming the strawberry or raspberry jam with water and lemon juice in a small saucepan over low heat, stirring until the mixture becomes smooth and pourable. Let the glaze cool for about 5 minutes so it’s not so hot that it melts the frosting, then pour it over the top center of the cake, using a spoon or offset spatula to gently encourage it to drip down the sides in an attractive pattern. Finish decorating by piping rosettes or borders with extra cream cheese frosting, sprinkling red velvet cake crumbs around the edges, and scattering dark chocolate chips across the top for visual interest and extra flavor. Refrigerate the finished cake for at least 1 hour before slicing to ensure clean cuts.
Expert Tips
- Use gel food coloring instead of liquid for vibrant red color without thinning the batter
- Bring all dairy ingredients to room temperature before mixing for smoothest texture
- Chill all cake layers completely before assembling to prevent sliding and melting
- Apply a crumb coat first and refrigerate before final frosting for professional finish
- Don’t overbake the cheesecake; slight jiggle in center is perfect
- Make the cheesecake layer a day ahead to simplify assembly process
Serving Suggestions
This Red Velvet Cheesecake Layer Cake makes a stunning centerpiece for any celebration from birthdays to anniversaries to holiday gatherings. Serve slices on white plates to let the dramatic red color really stand out, and add a garnish of fresh raspberries or strawberries alongside each portion. A strong cup of coffee or creamy latte pairs wonderfully with this rich cake, cutting through the sweetness while complementing the chocolate notes. For an extra special presentation, dust the serving plates with a tiny bit of cocoa powder before placing the cake slices. You can also create mini versions by baking the red velvet in cupcake tins and assembling individual portions in clear glasses with layers of cake, cheesecake, and frosting visible through the sides.
Storage Instructions
Store leftover Red Velvet Cheesecake Layer Cake in an airtight container in the refrigerator where it will stay fresh for 4 to 5 days. The cream cheese frosting and cheesecake layer require cold storage to maintain their texture and prevent spoilage. This cake actually tastes best when served slightly chilled rather than at room temperature, so you can slice and serve it straight from the fridge. To freeze the cake for longer storage, wrap it tightly in plastic wrap and then aluminum foil to protect it from freezer burn, and it will keep for up to 2 months. Thaw frozen cake overnight in the refrigerator before serving, never at room temperature which can cause condensation and sogginess.
Common Questions
Can I skip the chocolate cookie crust?
Absolutely! The crust is optional and adds texture but isn’t essential to the cake. Simply bake the cheesecake layer in a lined springform pan without the crust, and it will work perfectly.
Why isn’t my red velvet cake bright red?
Use red gel food coloring rather than liquid versions for vibrant, true red color. Liquid food coloring dilutes the batter and won’t achieve the same intensity no matter how much you add.
How do I prevent my cheesecake from cracking?
Bake the cheesecake at a lower temperature of 325 degrees and don’t overbake it. The center should still jiggle slightly when removed from the oven, as it firms up during cooling. Avoid overmixing the batter which incorporates too much air.
Can I make this cake gluten-free?
Yes, substitute the all-purpose flour with a gluten-free flour blend that contains xanthan gum for structure. Make sure your baking powder and other ingredients are also certified gluten-free. The texture may vary slightly but will still be delicious.
Do I have to use buttermilk?
No, you can make a buttermilk substitute by adding 1 tablespoon of white vinegar or lemon juice to 1 1/2 cups of regular milk. Let it sit for 5 minutes before using, and it will provide the same tangy flavor and tender crumb.
How far in advance can I make this cake?
You can make the cheesecake layer up to 2 days ahead and keep it refrigerated. Bake the red velvet layers the day before and wrap them well. Assemble and frost the cake the day you plan to serve it for best results.

Red Velvet Cheesecake Layer Cake Recipe
Ingredients
Equipment
Method
- Mix chocolate cookie crumbs with melted butter until mixture resembles wet sand.
- Press mixture evenly into bottom of 9-inch springform pan. Bake at 350°F (175°C) for 10 minutes. Cool completely.
- Preheat oven to 350°F (175°C). Grease and line two 9-inch round cake pans with parchment paper.
- In large bowl, whisk together flour, cocoa powder, baking soda, baking powder, and salt.
- In separate bowl, blend sugar, vegetable oil, eggs, buttermilk, vinegar, vanilla, and red gel food coloring until smooth.
- Gradually combine wet ingredients with dry ingredients, mixing just until smooth. Do not overmix.
- Divide batter evenly between pans. Bake for 25-30 minutes until toothpick comes out clean. Cool completely.
- Beat softened cream cheese and sugar until smooth and creamy with no lumps.
- Add eggs one at a time, beating well after each addition. Mix in vanilla and sour cream until fully incorporated.
- Pour cheesecake batter over cooled cookie crust (or into prepared pan if skipping crust).
- Bake at 325°F (160°C) for 40-45 minutes until set but still slightly jiggly in center. Cool fully, then refrigerate at least 4 hours.
- Beat softened cream cheese and butter together until light and fluffy, about 3-4 minutes.
- Gradually add powdered sugar one cup at a time, beating well after each addition. Mix in vanilla extract.
- Continue beating until frosting is smooth, creamy, and holds its shape.
- Place one red velvet layer on serving plate. Spread thin layer of cream cheese frosting on top.
- Carefully remove chilled cheesecake from springform pan and place on top of frosted cake layer.
- Spread another thin layer of frosting on top of cheesecake. Gently place second red velvet layer on top.
- Frost entire cake with remaining cream cheese frosting, smoothing sides and top evenly. Apply crumb coat first if desired, refrigerate 30 minutes, then apply final frosting layer.
- Warm strawberry or raspberry jam with water and lemon juice in small saucepan over low heat until smooth and pourable.
- Let glaze cool 5 minutes, then pour over top center of cake, encouraging it to drip down sides.
- Decorate with piped frosting rosettes, red velvet crumbs, and dark chocolate chips. Refrigerate at least 1 hour before slicing.
Notes
- Chill all cake layers before assembling to prevent sliding
- Use gel food coloring instead of liquid for vibrant red color
- Cheesecake layer can be made a day ahead and refrigerated
- Cake keeps well in fridge for 4-5 days, serve slightly chilled
- For gluten-free version, use gluten-free flour blend with xanthan gum
- Don’t overbake cheesecake – slight jiggle in center is perfect
- Apply crumb coat first for cleanest finish
- Bring all dairy ingredients to room temperature before mixing
- Can freeze wrapped cake for up to 2 months
- Make buttermilk substitute with milk + vinegar if needed