I will never forget the first time I encountered funeral potatoes at a church potluck in Salt Lake City. My friend’s grandmother brought this enormous casserole dish filled with golden, bubbling, cheesy goodness, and I watched in amazement as it disappeared within minutes. When I asked about the unusual name, she laughed and explained this beloved dish has been a Utah tradition for decades, served at everything from funerals to Thanksgiving dinners. After one bite of those creamy, crunchy potatoes, I understood why people request them at every gathering. Now it’s my go-to dish when I need to feed a crowd or bring comfort food to someone who needs it.
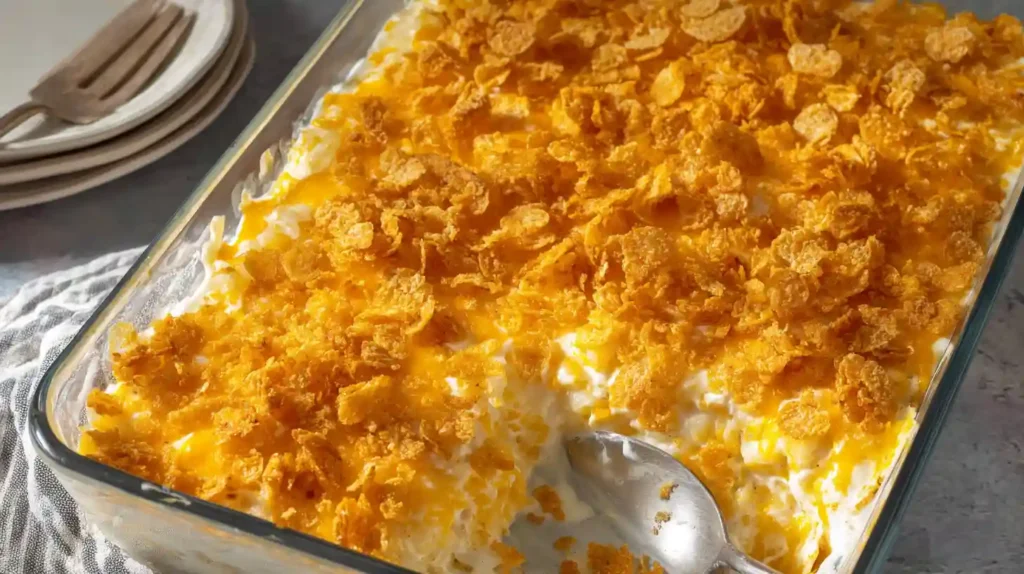
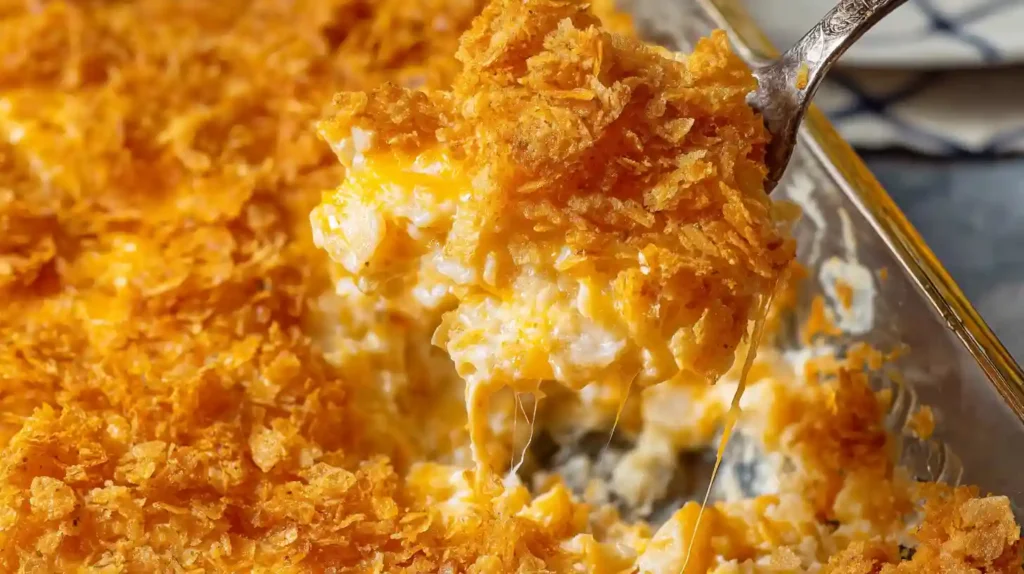
Cheesy Funeral Potatoes are a classic American casserole featuring frozen hash browns mixed with cream of chicken soup, sour cream, cream cheese, and cheddar cheese, topped with buttery crushed cornflakes. The dish originated in Utah and became popular in Latter-day Saint communities as a comforting side dish perfect for potlucks, holiday meals, and gatherings. Despite the somber name, these potatoes bring joy to any occasion with their rich, creamy texture and crispy golden topping.
Why This Recipe Works
Using frozen hash browns eliminates the tedious work of peeling and shredding potatoes while ensuring consistent texture every time. The combination of cream cheese and sour cream creates an ultra-creamy base that coats each potato piece perfectly. Cream of chicken soup adds savory depth and helps bind everything together without making a traditional cheese sauce from scratch.
The buttered cornflake topping provides essential textural contrast against the soft, creamy potatoes underneath. As the casserole bakes, the cornflakes turn golden brown and crispy while the cheese melts into gooey perfection. Thawing the frozen hash browns before mixing prevents excess moisture that would make the dish watery. Grating your own cheese ensures smooth melting without the anti-caking agents found in pre-shredded varieties.
What You Need
- 1 cup unsalted butter, divided (½ cup + ½ cup)
- 1 (10.75 oz) can cream of chicken soup
- 16 oz sour cream (can use light)
- 8 oz cream cheese, softened
- 1 teaspoon salt
- ½ teaspoon black pepper
- 1 teaspoon garlic powder
- 1 yellow onion, finely grated
- 1 (30-32 oz) package frozen shredded or cubed hash browns, thawed
- 3 cups sharp cheddar cheese, freshly grated
- 3 cups cornflakes, lightly crushed
Making It Happen
Thaw and Prep
The night before making this recipe, transfer the frozen hash browns from the freezer to the refrigerator to thaw overnight. This gradual thawing prevents excess moisture accumulation that can make your casserole soggy. If you forget to thaw them overnight, you can spread them on a baking sheet at room temperature for about 2 hours before assembling.
Preheat your oven to 350°F and generously coat a 9×13-inch baking dish with cooking spray or butter. Make sure to get the corners and sides well-greased so the cheesy potatoes release easily after baking. Set the prepared dish aside while you make the filling.
Create the Creamy Base
In a large mixing bowl, combine ½ cup melted butter, cream of chicken soup, sour cream, and softened cream cheese. Use a whisk or electric mixer to blend until completely smooth with no lumps of cream cheese remaining. The mixture should look uniform and creamy. Add the salt, black pepper, garlic powder, and finely grated onion, mixing thoroughly to distribute the seasonings evenly.
Grating the onion finely rather than dicing it allows the onion flavor to disperse throughout the dish without creating chunks that picky eaters might avoid. The moisture from the grated onion also blends seamlessly into the creamy mixture. Make sure your cream cheese is truly softened to room temperature; cold cream cheese will create lumps that are difficult to smooth out.
Combine Potatoes and Cheese
Add the thawed hash browns and shredded cheddar cheese to the bowl with your creamy base. Use a large spatula or wooden spoon to mix everything together until each potato piece is evenly coated with the cheese mixture. This takes some effort—you want to ensure uniform distribution so every serving has the same delicious flavor.
Transfer the potato mixture to your prepared baking dish, spreading it into an even layer. Press down gently with your spatula to eliminate air pockets and create a level surface for the topping. The mixture will seem thick and heavy, which is exactly what you want for the best texture after baking.
Prepare the Crispy Topping
Place the cornflakes in a large resealable plastic bag and crush them with your hands or a rolling pin. You want pieces that are smaller than regular cornflakes but not pulverized into dust—aim for roughly quarter-sized pieces with some variation. In a medium bowl, pour the remaining ½ cup melted butter over the crushed cornflakes and stir until every piece is coated with butter.
Sprinkle the buttered cornflakes evenly over the top of the potato mixture, covering the entire surface. The butter helps the cornflakes turn golden brown and crispy during baking while adding rich flavor. Make sure you get cornflakes all the way to the edges of the dish for maximum crunch in every serving.
Bake to Perfection
Bake the casserole uncovered at 350°F for 40 to 45 minutes, until the potatoes are bubbling around the edges and the cornflake topping is golden brown. You should see the cheese mixture bubbling up through the topping around the perimeter. If you want extra crispy topping, place the dish under the broiler for the final 1 to 2 minutes, watching carefully to prevent burning.
Let the casserole rest for 5 minutes before serving to allow the cheese sauce to set slightly. This makes it easier to scoop clean portions and prevents the filling from being too runny. Serve hot and watch it disappear!
Expert Tips
- Always thaw frozen hash browns completely before mixing to prevent watery casserole
- Grate fresh cheese from a block for superior melting without clumping
- Finely grate the onion so it blends invisibly into the creamy mixture
- Use full-fat dairy products for richest flavor and creamiest texture
- Crush cornflakes to varied sizes for interesting textural contrast
- Cover with foil if topping browns too quickly during baking
Delicious Variations
Make it vegetarian by swapping cream of mushroom or cream of celery soup for the cream of chicken. Add protein by mixing in diced cooked ham, crumbled bacon, or shredded rotisserie chicken. For Tex-Mex style, add a small can of diced green chilies, use Monterey Jack cheese, and top with crushed tortilla chips instead of cornflakes.
Try different toppings like crushed Ritz crackers, kettle potato chips, panko breadcrumbs, or crispy fried onions. Add sautéed red bell peppers and onions for extra vegetables and color. Use a combination of cheddar and Colby Jack cheese for different flavor. Stir in frozen peas or corn for added nutrition without compromising the comfort food appeal.
Storage and Make-Ahead
Store leftover funeral potatoes in an airtight container in the refrigerator for up to 5 days. Reheat individual portions in the microwave on medium power for 30 to 60 second intervals until heated through. For larger portions, reheat covered in a 350°F oven for 15 to 20 minutes until hot and bubbly.
You can assemble this casserole up to 2 days before baking and store it covered in the refrigerator. When ready to serve, add the cornflake topping and bake as directed, adding 5 to 10 extra minutes since it starts cold. For freezing, assemble without the topping, wrap tightly, and freeze for up to 2 to 3 months. Thaw overnight in the refrigerator, add fresh cornflake topping, and bake as directed.
Perfect Pairings
These cheesy funeral potatoes pair beautifully with holiday mains like roasted turkey, honey-glazed ham, prime rib, or herb-crusted pork loin. Serve alongside other classic sides like green bean casserole, cranberry sauce, and dinner rolls for a complete feast. The rich, creamy potatoes complement simple grilled proteins like steak or chicken perfectly.
For brunch, serve with scrambled eggs, crispy bacon, sausage links, and fresh fruit salad. The casserole works equally well for casual weeknight dinners paired with a simple green salad and garlic bread. Consider it your secret weapon for potlucks, where it travels well and feeds a crowd without breaking the budget.
Common Questions
Why are they called funeral potatoes?
The name comes from the tradition of serving this casserole at funeral luncheons in Utah and other areas with large Latter-day Saint populations. The dish is easy to make in large quantities, travels well, and provides comforting food during difficult times. Despite the somber association, funeral potatoes are now served at all types of gatherings including holidays, potlucks, and celebrations.
Can I use fresh potatoes instead of frozen hash browns?
Yes, but frozen hash browns are much more convenient and provide consistent results. If you prefer fresh potatoes, you will need to peel and shred about 2 pounds of russet potatoes. Rinse the shredded potatoes well to remove excess starch, then pat them completely dry before mixing with other ingredients. The texture may be slightly different from the classic version.
What can I use instead of cream of chicken soup?
Cream of mushroom or cream of celery soup works perfectly as a substitute. You can also make homemade cream soup by creating a roux with butter and flour, then whisking in chicken broth and heavy cream until thickened. For a lighter version, use low-fat or reduced-sodium versions of canned soup.
How do I prevent soggy funeral potatoes?
The key is thoroughly thawing and draining the frozen hash browns before mixing. Excess moisture is the main culprit for watery casseroles. Pat the thawed hash browns with paper towels if they seem wet. Also avoid over-mixing the ingredients, which can break down the potatoes and release more moisture. Baking uncovered allows steam to escape.
Can I make funeral potatoes in a slow cooker?
Yes, funeral potatoes adapt well to slow cooker preparation. Mix all the base ingredients as directed and pour into a greased slow cooker. Cook on low for 3 to 4 hours or high for 1.5 to 2 hours. Add the buttered cornflakes during the last 30 minutes of cooking with the lid slightly ajar so they stay crispy. The oven version provides better texture on the topping.
Why do my cornflakes get soggy?
Make sure to add the cornflake topping right before baking, not while assembling ahead of time. Butter the cornflakes thoroughly, as the fat creates a barrier against moisture. Bake uncovered so steam can escape rather than settling back onto the topping. If making ahead, store the buttered cornflakes separately and add them just before baking.

Cheesy Funeral Potatoes
Ingredients
Equipment
Method
- The night before, transfer frozen hash browns from freezer to refrigerator to thaw overnight. Preheat oven to 350°F and generously coat a 9×13-inch baking dish with cooking spray.
- In a large mixing bowl, combine ½ cup melted butter, cream of chicken soup, sour cream, and softened cream cheese. Whisk until completely smooth with no lumps.
- Add salt, black pepper, garlic powder, and finely grated onion to the creamy mixture. Mix thoroughly to distribute seasonings evenly.
- Add thawed hash browns and shredded cheddar cheese to the bowl. Mix everything together with a large spatula until each potato piece is evenly coated.
- Transfer the potato mixture to the prepared baking dish, spreading into an even layer. Press down gently to eliminate air pockets.
- Place cornflakes in a large resealable plastic bag and crush into quarter-sized pieces. In a medium bowl, pour remaining ½ cup melted butter over crushed cornflakes and stir until evenly coated.
- Sprinkle the buttered cornflakes evenly over the potato mixture, covering the entire surface completely.
- Bake uncovered at 350°F for 40 to 45 minutes, until potatoes are bubbling around edges and cornflake topping is golden brown. For extra crispy topping, broil for final 1-2 minutes, watching carefully.
- Let the casserole rest for 5 minutes before serving to allow cheese sauce to set slightly. Serve hot.
Notes
- Always thaw frozen hash browns completely overnight in the refrigerator to prevent watery casserole
- Grate fresh cheese from a block for superior melting without clumping
- Finely grate the onion so it blends invisibly into the mixture
- Can substitute cream of mushroom or cream of celery soup for vegetarian version
- Make ahead: Assemble up to 2 days before baking, add topping just before baking
- Storage: Refrigerate leftovers for up to 5 days; freeze assembled casserole without topping for 2-3 months
- Different topping options: crushed Ritz crackers, kettle chips, panko, or fried onions
- Add diced ham, bacon, or chicken for protein-packed version