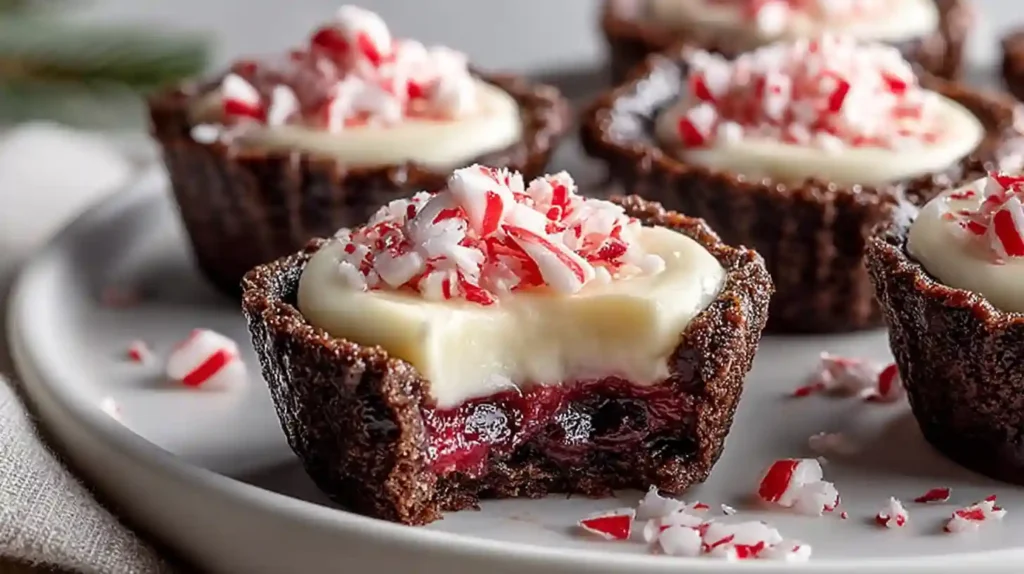
These Chocolate Peppermint Cookie Cups with Cheesecake combine everything I love about the holidays in one stunning bite-sized dessert. Rich, fudgy chocolate cookie cups cradle a light and creamy peppermint cheesecake filling that melts on your tongue. The double cocoa base creates an intensely chocolatey foundation that perfectly balances the refreshing peppermint cream cheese filling. Crushed candy canes on top add that satisfying crunch and festive touch that makes these irresistible at holiday parties. I discovered this recipe three years ago when searching for a dessert that looked impressive but didn’t require hours in the kitchen. These cookie cups take only 30 minutes of active prep time and the rest is just chilling while you do other things.
Why This Recipe Works
Most cookie cup recipes use plain chocolate chips, but this version doubles down with both Dutch-processed cocoa powder and black cocoa powder. This combination creates cookies that taste like dark chocolate fudge and hold their cup shape perfectly after baking. The cheesecake filling starts with real cream cheese whipped with heavy cream instead of using shortcuts like Cool Whip. This gives you a filling that tastes like actual cheesecake with that tangy richness that cuts through all the chocolate. The secret to getting those perfect wells in the cookies is pressing down with a small jar while the cookies are still hot from the oven, which shapes them without cracking.
Essential Ingredients
Gather these ingredients before you start:
Chocolate Cookie Cups
- 2 cups all-purpose flour
- 1/4 cup Dutch-processed cocoa powder, sifted
- 1/4 cup black cocoa powder
- 1 teaspoon baking soda
- 1/2 teaspoon salt
- 1 cup unsalted butter at room temperature
- 1/2 cup granulated sugar
- 1 cup light brown sugar, packed
- 2 large eggs at room temperature
- 1 teaspoon vanilla extract
Peppermint Cheesecake Filling
- 1 cup heavy whipping cream, chilled
- 8 ounces full-fat cream cheese at room temperature
- 1/2 cup granulated sugar
- 1 teaspoon peppermint extract
- Red food color gel for decoration
- Candy canes, chopped for garnish
Step by Step Instructions
Preheat your oven to 350 degrees Fahrenheit. Spray two standard cupcake tins thoroughly with cooking spray, making sure to get into all the grooves. This prevents the cookie cups from sticking. In a medium bowl, whisk together the flour, both cocoa powders, baking soda, and salt until no lumps remain. Set this mixture aside.
In your stand mixer fitted with the paddle attachment, beat the room temperature butter with both sugars on medium-high speed for 2 to 3 minutes. The mixture should look light, fluffy, and almost doubled in volume. This creaming step incorporates air that keeps the cookie cups tender. Scrape down the sides of the bowl to make sure everything combines evenly.
Reduce the mixer speed to low and add the eggs one at a time, beating well after each addition until no yellow streaks remain. Add the vanilla extract and beat until fully incorporated. Pour in all the dry ingredients at once. Mix on low speed just until the dough comes together with no flour pockets visible. Don’t overmix or the cookies will turn out tough.
Use a large cookie scoop or about 3 tablespoons of dough to portion the mixture evenly into the prepared muffin tins. You should get about 20 cookie cups total. Bake for 10 to 13 minutes until the cookies are set around the edges but still slightly soft in the centers. They will look slightly underdone but that’s exactly what you want.
The moment the cookie cups come out of the oven, grab a small jar, bottle, or round container. Press down firmly into the center of each hot cookie to create a deep well for the filling. Work quickly because the cookies firm up as they cool. Let them cool in the pans for 10 minutes to set their shape. Gently twist each cookie cup to loosen it from the tin, then let them cool for another 5 minutes before transferring to a wire rack to cool completely.
While the cookies cool, make the peppermint cheesecake filling. Use a chilled bowl and whisk attachment to whip the cold heavy cream until stiff peaks form. The cream should stand up straight when you lift the whisk. Set this aside. In a separate bowl, beat the room temperature cream cheese with the sugar and peppermint extract until completely smooth with no lumps. Take a large spoonful of the whipped cream and stir it into the cream cheese mixture to lighten it. Then gently fold in the remaining whipped cream using a rubber spatula. Use smooth, swooping motions to keep as much air in the mixture as possible.
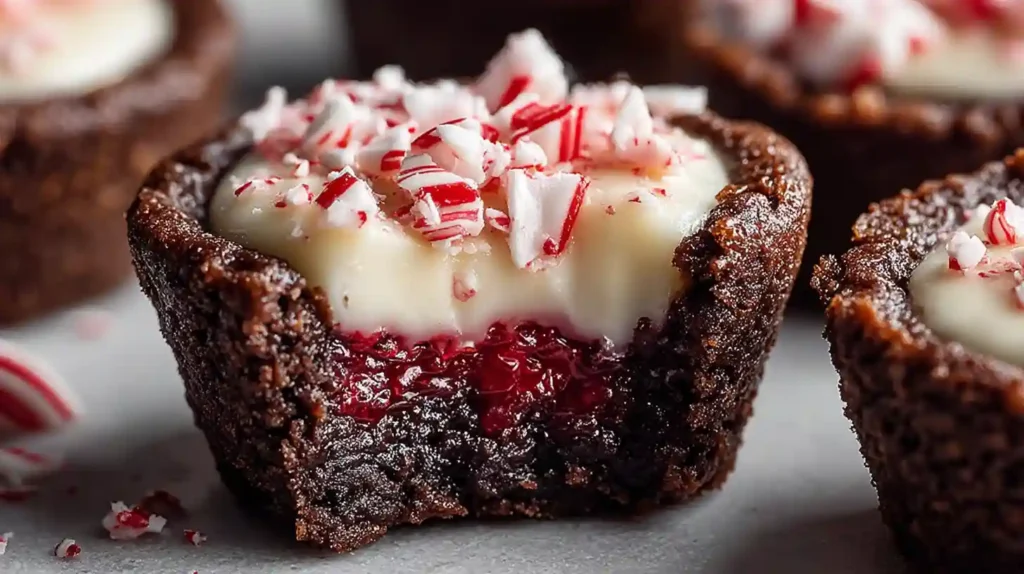
For a festive presentation, use a small food-safe paintbrush to paint two thin red stripes on the inside of a piping bag fitted with a large round tip. Fill the bag carefully with the peppermint cheesecake filling. When you pipe the filling, the red stripes will create a candy cane swirl effect. Pipe a generous swirl of filling into each cooled cookie cup, filling them almost to the top. Refrigerate the filled cookie cups for 1 to 2 hours until the filling sets firm. Just before serving, sprinkle chopped candy canes over the top of each cup.
Expert Tips for Success
- Use room temperature eggs and butter for smoother cookie dough that mixes evenly
- Chill your bowl and whisk in the freezer for 15 minutes before whipping cream for better volume
- Black cocoa powder gives an intense color and deeper chocolate flavor but you can use all Dutch-processed cocoa if needed
- Press the wells into hot cookies immediately after baking while they’re still soft and pliable
- Don’t skip softening the cream cheese or you’ll have lumps in your filling
- Use peppermint extract sparingly as it’s very strong – start with 3/4 teaspoon and add more if needed
- Add candy cane topping right before serving so it stays crunchy
Customization Ideas
Swap peppermint extract for vanilla extract and top with chocolate shavings for plain chocolate cheesecake cups. Use mint extract instead of peppermint for a smoother mint flavor without the candy cane punch. Add a few drops of green food coloring to the filling for a different festive look. Try crushed Oreos or mini chocolate chips as topping alternatives. For adult gatherings, add 1 tablespoon of peppermint schnapps to the cheesecake filling. Make these into brownie cookie cups by adding 1/2 cup mini chocolate chips to the dough.
Serving Suggestions
These Chocolate Peppermint Cookie Cups shine as standalone treats at holiday parties and cookie exchanges. Serve them on a festive platter lined with crushed candy canes or fresh mint leaves for extra visual appeal. Pair them with peppermint hot chocolate or coffee for a dessert course that echoes the flavors. For a dessert board, arrange them alongside vanilla ice cream, fresh berries, and chocolate-dipped pretzels. They also make beautiful gifts when packed in decorative boxes with tissue paper and ribbon.
Storage and Make Ahead
Store filled cookie cups in an airtight container in the refrigerator for 2 to 3 days. Layer them carefully between sheets of parchment paper so the filling doesn’t smudge. For longer storage, freeze the cookie cups without the candy cane topping for up to 4 weeks in a freezer-safe container. Thaw them overnight in the refrigerator before adding fresh candy cane pieces on top. You can bake the cookie cup shells up to 2 days ahead and store them in an airtight container at room temperature, then fill them the day of serving for maximum freshness.
Troubleshooting Common Issues
If your cookie cups crack when pressing down the wells, they may have baked too long or cooled too much. Make sure to press immediately after removing from the oven while they’re still very soft. Cookies that spread too thin mean your butter was too warm or you didn’t cream it long enough. Chill the dough for 20 minutes before baking next time. A grainy filling comes from cold cream cheese that didn’t blend smoothly. Let it sit at room temperature for at least an hour before mixing. Runny filling means you didn’t whip the cream to stiff peaks or you overmixed when folding. The filling should hold its shape when piped.
Frequently Asked Questions
Can I use regular cocoa powder instead of black cocoa powder?
Yes, you can substitute regular Dutch-processed cocoa powder for the black cocoa powder. Your cookie cups will be slightly lighter in color and have a less intense chocolate flavor, but they will still taste delicious and work perfectly for this recipe.
Is it possible to make the filling without heavy cream?
The whipped heavy cream creates the light, fluffy texture that makes this filling special. Without it, the filling becomes thick and dense like regular cream cheese frosting. For a lighter alternative, try folding in some whipped Greek yogurt, though the taste and texture will be noticeably different.
Can I prepare these cookie cups gluten-free?
Yes, substitute a gluten-free flour blend designed for baking that contains xanthan gum or another binder. Make sure it’s a 1:1 replacement blend. The cookie cups may have a slightly different texture but will retain the festive chocolate and peppermint flavors.
How do I prevent the cookie cups from cracking during baking?
Don’t overbake the cookies – pull them out when they’re set but still soft in the centers. Press down gently but firmly with your jar immediately after baking to create the wells while the cookies are still hot and pliable. Working carefully during cooling ensures they maintain their shape without cracks.
Can I make these cookie cups ahead of time for a party?
Absolutely! You can bake and shape the cookie cup shells up to 2 days ahead and store them at room temperature. Fill them with the cheesecake filling and refrigerate up to 24 hours before serving. Add the candy cane topping just before serving to keep it crunchy.
What size jar should I use to make the wells?
Use a small jar, bottle, or round container that’s about 1 to 1.5 inches in diameter. A spice jar, small medicine bottle, or even the handle end of a wooden spoon works well. The key is pressing down immediately while the cookies are still hot.
Can I freeze the filled cookie cups?
Yes, but freeze them without the candy cane topping. The candy canes will get soggy when thawed. Freeze the filled cups in a single layer on a baking sheet until solid, then transfer to a freezer-safe container for up to 4 weeks. Thaw overnight in the refrigerator and add fresh candy canes before serving.

Chocolate Peppermint Cookie Cups with Cheesecake
Ingredients
Equipment
Method
- Preheat and Prepare: Preheat oven to 350°F (175°C). Spray two standard cupcake tins thoroughly with cooking spray, making sure to get into all grooves.
- Mix Dry Ingredients: In a medium bowl, whisk together flour, Dutch-processed cocoa powder, black cocoa powder, baking soda, and salt until no lumps remain. Set aside.
- Cream Butter and Sugars: In stand mixer with paddle attachment, beat butter, granulated sugar, and brown sugar on medium-high speed for 2 to 3 minutes until light, fluffy, and almost doubled in volume. Scrape down sides of bowl.
- Add Eggs and Vanilla: Reduce mixer speed to low. Add eggs one at a time, beating well after each addition until no yellow streaks remain. Add vanilla extract and beat until fully incorporated.
- Combine Wet and Dry: Pour in all dry ingredients at once. Mix on low speed just until dough comes together with no flour pockets visible. Do not overmix.
- Portion Dough: Using a large cookie scoop or approximately 3 tablespoons, portion cookie dough evenly into prepared muffin tins. You should get about 20 cookie cups.
- Bake: Bake for 10 to 13 minutes until cookies are set around edges but still slightly soft in centers. They will look slightly underdone.
- Create Wells: Immediately after removing from oven, press down firmly into center of each hot cookie using a small jar or container to create a deep well for filling. Work quickly.
- Cool Cookies: Let cookie cups cool in pans for 10 minutes. Gently twist each cup to loosen, cool for another 5 minutes, then transfer to wire rack to cool completely.
- Whip Cream: Using a chilled bowl and whisk, whip chilled heavy cream until stiff peaks form. Cream should stand up straight when whisk is lifted. Set aside.
- Make Cheesecake Base: In separate bowl, beat cream cheese, sugar, and peppermint extract together until mixture is smooth and creamy with no lumps.
- Fold Together: Take a large spoonful of whipped cream and stir into cream cheese mixture to lighten it. Gently fold in remaining whipped cream using smooth, swooping motions to keep air in mixture.
- Prepare Piping Bag: Using small food-safe paintbrush, paint two thin decorative red stripes on inside of piping bag fitted with large round tip. Fill bag carefully with peppermint cheesecake filling.
- Fill Cookie Cups: Pipe a generous swirl of cheesecake filling into each cooled cookie cup, filling almost to the top.
- Chill: Refrigerate filled cookie cups for 1 to 2 hours until filling is set firm.
- Garnish and Serve: Just before serving, sprinkle chopped candy canes over top of each cup. Store refrigerated and consume within 2 to 3 days, or freeze without candy cane topping for up to 4 weeks.
Notes
- Room temperature eggs and butter create smoother cookie dough
- Chill bowl and whisk for 15 minutes before whipping cream for better volume
- Black cocoa powder enhances depth and color but can be replaced with Dutch-processed cocoa
- Press wells into hot cookies immediately after baking for best shaping
- Soften cream cheese completely to avoid lumps in filling
- Add candy cane topping just before serving to keep it crunchy
- Store in airtight container in refrigerator for 2-3 days
- Freeze without candy garnish for up to 4 weeks