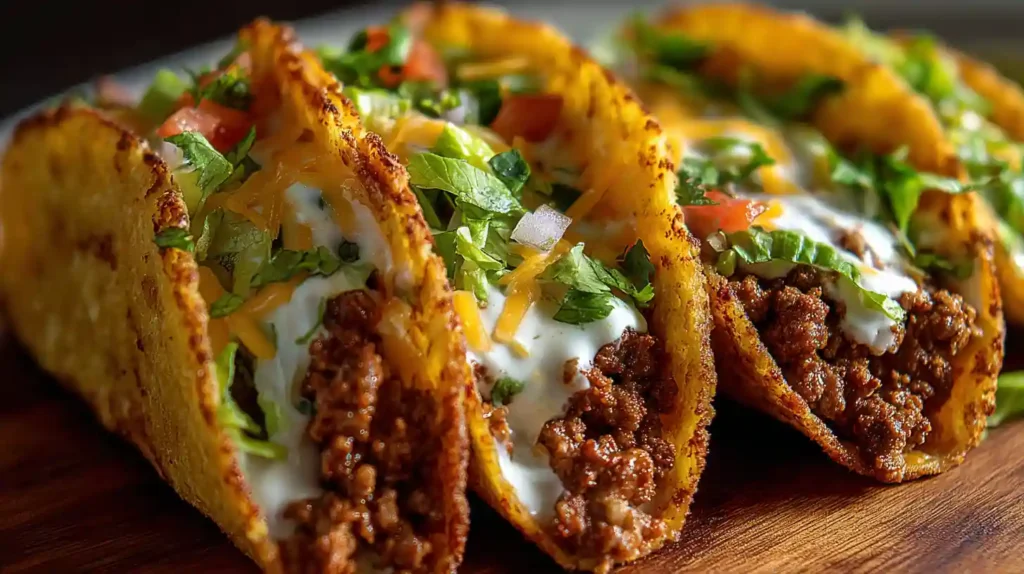
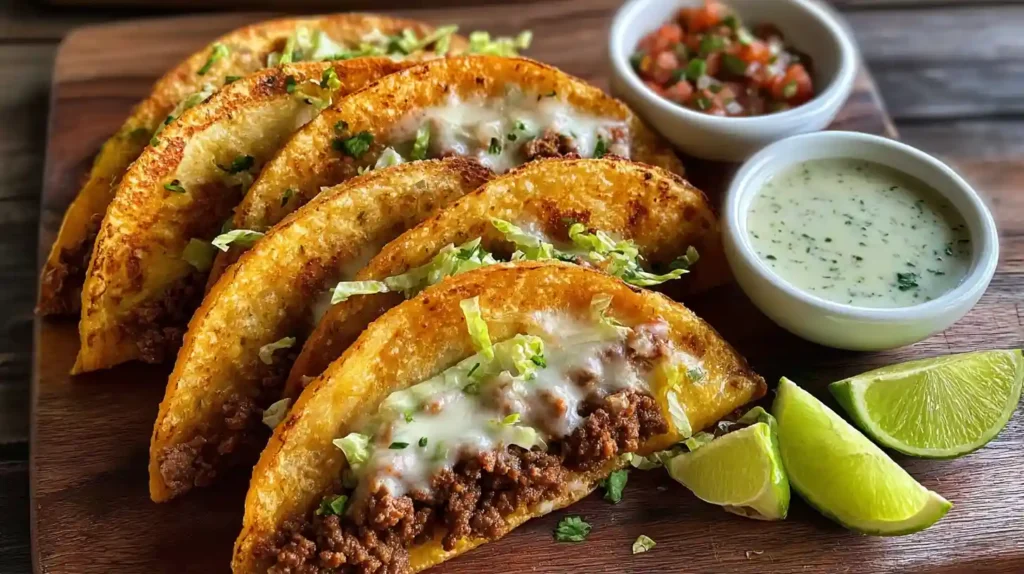
There is a distinct satisfaction in biting into freshly fried Crispy Ground Beef Tacos that store-bought hard shells simply cannot match. Making your own shells transforms a standard weeknight meal into something that feels like a special event, yet the process is surprisingly straightforward. The texture of a corn tortilla that has been fried just moments before serving offers a perfect crunch that doesn’t shatter into a thousand pieces instantly. It holds up beautifully against the juicy, seasoned meat filling.
This recipe focuses on the technique of frying the tortillas yourself, which is the secret to restaurant-quality tacos at home. You control the crispness and the shape, creating a wider opening that is easier to stuff with toppings. Combined with a simple homemade seasoning blend that skips the excessive salt of packet mixes, these tacos are fresh, flavorful, and incredibly satisfying. Whether you are looking for easy cooking recipes to spice up your rotation or just craving authentic texture, this method delivers every time.
Essential Ingredients for Crispy Tacos
The beauty of this dish lies in its simplicity. You don’t need exotic items, just quality staples that come together to create deep flavors. Using fresh ingredients for toppings is key to cutting through the richness of the fried shell and meat.
Corn Tortillas: You must use corn, not flour, for that authentic crunch and flavor. White or yellow corn tortillas both work well, but thin ones tend to fry up crispier than the thicker handmade style. Stale tortillas actually fry better than fresh ones as they hold less moisture.
Ground Beef: An 80/20 lean-to-fat ratio is ideal here. The fat carries the flavor of the spices and keeps the filling moist without making the taco greasy. If you use leaner beef, you might need to add a splash of beef broth or oil to prevent it from drying out.
Potatoes (Optional but Traditional): Many authentic recetas (recipes) for delicious snacks recipes or fillings include finely diced potatoes. They stretch the meat and absorb the savory juices, adding a wonderful textural contrast. It is a humble addition that makes a big difference.
How to Fry Perfect Taco Shells
Frying your own shells is the game-changer for Crispy Ground Beef Tacos. The goal is a shell that is golden and crisp but still has a tiny bit of chew in the center, unlike the brittle boxed versions.
Heat about an inch of vegetable oil in a skillet over medium-high heat. Test the temperature by dipping the edge of a tortilla in; if it bubbles vigorously, it is ready. Carefully slide a tortilla into the oil. Let it cook flat for about 10-15 seconds to firm up slightly. Then, using tongs, fold it in half, leaving a gap between the sides so you can fill it later. Hold one side down in the oil to fry, then flip to fry the other side. This process takes about 2 minutes per shell.
Mastering the Beef Filling
While the shells cool on a wire rack, focus on the meat. Brown the ground beef in a large skillet, breaking it up into small crumbles. Drain most of the excess fat, but leave about a tablespoon in the pan for flavor. Add diced onions and minced garlic, sautéing until softened.
Stir in your spices: cumin, chili powder, garlic powder, onion powder, and oregano. Toasting the spices with the meat for a minute before adding liquid blooms their flavor. Pour in tomato sauce or a little water and let it simmer until the liquid reduces and coats the meat. This ensures the filling is juicy but not wet enough to make your crispy shells soggy.
Troubleshooting Common Mistakes
If your shells are tough rather than crispy, your oil temperature was likely too low. The tortilla absorbs oil instead of frying quickly. Conversely, if they burn before crisping, the oil is too hot. Maintain a steady medium heat and adjust as necessary.
Another common issue is shells closing up during frying. Use your tongs to actively hold the shell open while it fries on the first side. Once the structure is set, it will hold its shape. Do not overcrowd the pan; fry one or two at a time to maintain oil temperature and control.
Creative Variations and Substitutions
You can easily adapt this recipe to fit different dietary needs or pantry availability. These cooking recipes for dinner are flexible by nature.
- Meat Alternatives: Ground turkey or chicken works well for a lighter option. Just be sure to season generously as poultry is milder than beef. For a vegetarian version, use lentils or finely chopped mushrooms.
- Spice Levels: For more heat, add minced jalapeños or a pinch of cayenne pepper to the beef mixture. For a smoky flavor, use smoked paprika or chipotle powder.
- Cheesy Shells: Sprinkle a little shredded cheese on the tortilla immediately after flipping it in the oil (carefully!) or dust the hot drained shells with powdered parmesan for a savory crust.
Serving Suggestions and Toppings
The toppings are where you can customize each taco. Traditional garnish includes shredded iceberg lettuce, diced tomatoes, and grated cheddar or cheddar-jack cheese. The cool, crisp lettuce provides a necessary freshness against the hot, fried shell and savory meat.
For a more modern twist, try pickled red onions, cotija cheese, or a drizzle of crema. Sliced radishes add a nice peppery crunch that complements the beef. Serve these alongside rice and beans or simple sweet snacks recipes like churros for dessert to complete the meal.
Storage and Reheating Tips
Fried taco shells are best enjoyed immediately. However, if you have leftovers, store the shells and meat separately. Keep shells in an airtight container at room temperature to maintain crispness. The meat should go in the fridge.
To reheat shells, place them on a baking sheet in a 350°F oven for about 5 minutes. This will restore their crunch and warm them through. Microwaving the shells will make them chewy and tough, so avoid it if possible. The meat can be reheated in a saucepan or microwave.
FAQ
Can I make the taco shells in an air fryer?
Yes, you can make crispy shells in an air fryer. Lightly spray the tortillas with oil, drape them over a taco rack or folded foil to hold the shape, and air fry at 375°F for 4-6 minutes until golden. They will be crunchier and drier than oil-fried versions.
Why are my corn tortillas cracking when I fold them?
Cold corn tortillas crack easily. If you aren’t frying them, warm them in a dry skillet or microwave for a few seconds to make them pliable before filling. For frying, the hot oil makes them pliable instantly, so cracking is rarely an issue unless the tortilla is very old.
What is the best oil for frying tacos?
Neutral oils with high smoke points are best. Vegetable oil, canola oil, or corn oil are standard choices. Avoid olive oil as it has a lower smoke point and can impart a strong flavor that might clash with the corn taste.
Can I bake the tacos instead of frying?
You can make baked tacos “dorados” style. Fill warmed tortillas with meat, fold them, spray generously with oil, and bake on a sheet pan at 400°F for 15-20 minutes, flipping halfway. They won’t be as evenly crispy as fried ones but are delicious.
How far in advance can I fry the shells?
You can fry the shells up to 2 hours before serving. Leave them on a wire rack at room temperature. Do not cover them while warm or they will steam and soften. If they need crisping up, pop them in the oven briefly before dinner.

Crispy Ground Beef Tacos
Ingredients
Equipment
Method
- Heat the oil in a skillet over medium-high heat. Fry each tortilla for 10 seconds per side, then fold in half and fry each side until golden and crisp. Drain on a wire rack.
- Cook the ground beef in a separate pan over medium heat, breaking it apart with a spoon, until browned. Drain excess fat.
- Add onions and garlic to the meat, sautéing for 3-4 minutes until soft.
- Stir in chili powder, cumin, oregano, salt, pepper, and tomato sauce. Simmer for 5 minutes until thickened.
- Fill each crispy shell with meat mixture.
- Top with shredded lettuce, cheese, and your favorite salsa before serving immediately.
Notes
- Keep shells warm in a low oven (200°F) while frying the rest.
- Ensure oil is hot enough to prevent greasy shells.