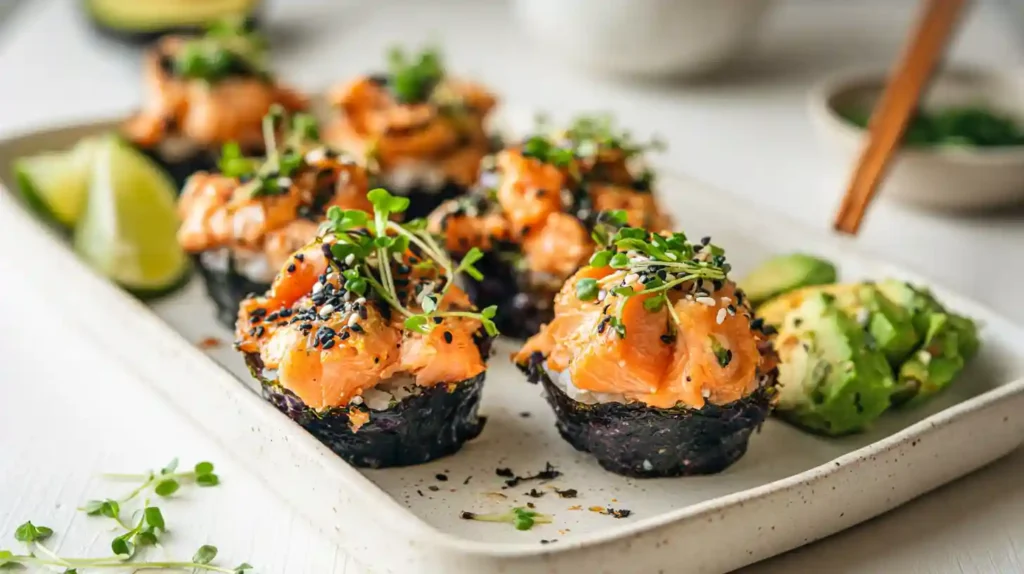
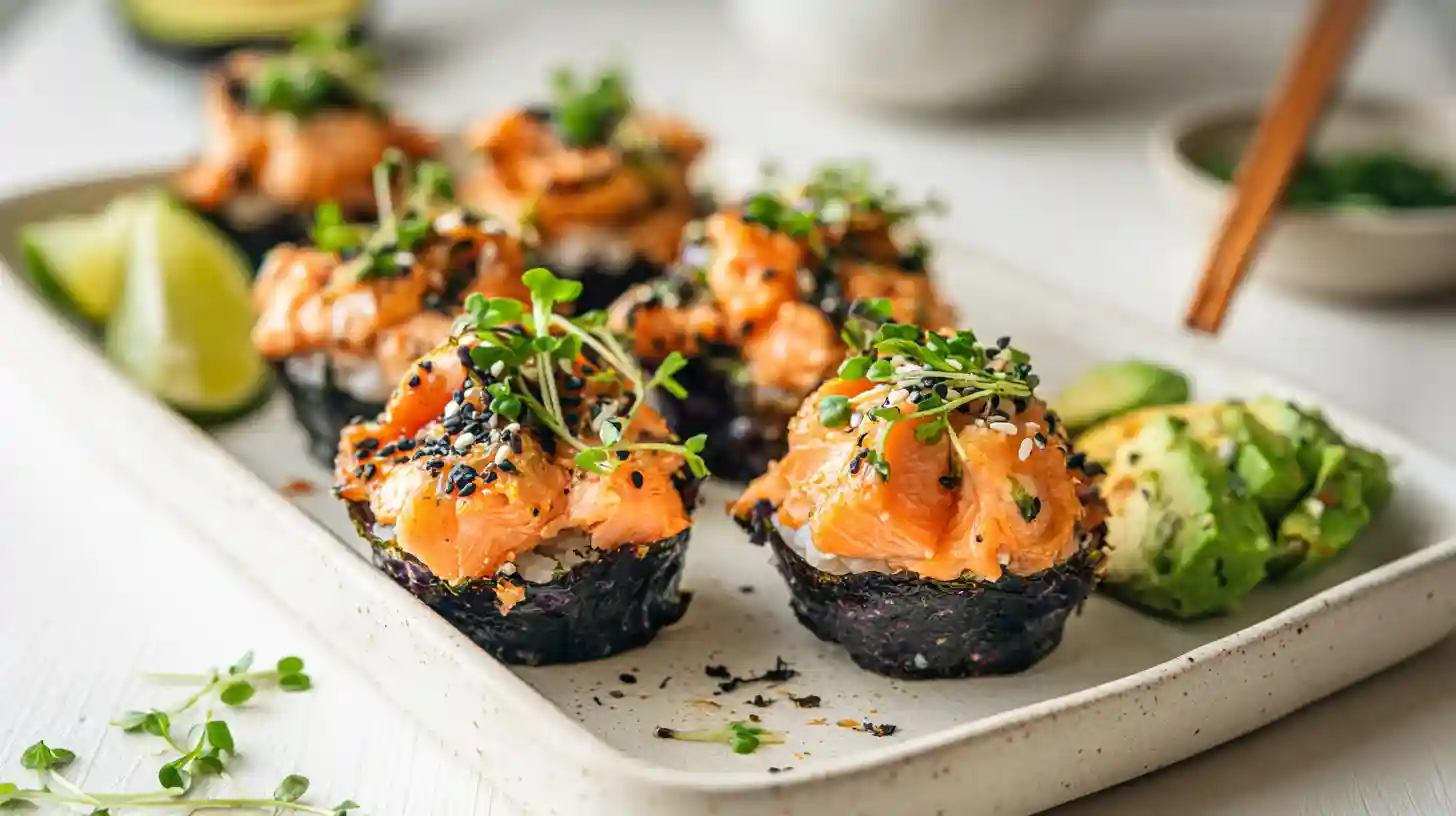
My friend showed me a TikTok video of these cute little Salmon Sushi Cups last month, and I immediately ran to the kitchen to try them. What a game changer. Instead of fumbling with bamboo mats and hoping my sushi rolls do not fall apart, I just pressed everything into a muffin tin and popped it in the oven. The result was these adorable baked cups with crispy edges, perfectly seasoned rice, and tender salmon that made everyone at my dinner party go quiet for five minutes straight.
These Salmon Sushi Cups take about 30 minutes from start to finish, with most of that being hands-off oven time. You get all the flavors of your favorite salmon roll without needing any special rolling skills or equipment beyond a standard muffin tin. At roughly 180 calories per cup, they work as appetizers, snacks, or even a light dinner when you make a double batch. My kids love helping assemble them, which means I actually get to sit down while dinner cooks.
What Makes These Different
Traditional sushi requires precision, patience, and practice to master those tight rolls. These cups flip the script entirely by deconstructing everything into layers. The nori acts as a wrapper that gets slightly crispy in the oven, while the rice forms a sturdy base that holds everything together. When you bake the salmon on top with kewpie mayo, sriracha, and sesame oil, it creates this incredible caramelized crust that you cannot get with raw sushi.
The beauty here is how forgiving they are. Rice too sticky? No problem, it still works. Salmon pieces uneven? Totally fine. The muffin tin keeps everything contained and shaped perfectly. Plus, serving these warm feels like a completely different experience than cold sushi, almost like a savory seafood muffin that happens to taste like your favorite roll.
Salmon Sushi Cups Ingredients
Gathering everything takes maybe ten minutes if you are moving slowly. Most ingredients are pantry staples if you cook Asian food regularly.
- 1 cup sushi rice, uncooked, which yields about 3 cups cooked
- 2 tablespoons rice vinegar for that classic sushi tang
- 1 tablespoon sugar to balance the vinegar
- 8 ounces fresh salmon fillet, cut into small cubes
- 2 tablespoons soy sauce for umami depth
- 3 tablespoons kewpie mayo, the Japanese kind with the squeeze bottle
- 1 tablespoon sriracha, adjust based on your heat tolerance
- 1 teaspoon sesame oil for nutty richness
- 4 nori sheets, cut into squares to fit your muffin tin
- Furikake seasoning for garnish, the seaweed rice seasoning
- 2 green onions sliced thin, for color and bite
- Extra sriracha and mayo for drizzling on top
How to Make Perfect Sushi Cups
Start by cooking your sushi rice according to package directions. While it cooks, you can prep everything else. Once the rice finishes, transfer it to a large bowl and let it cool slightly so you can handle it without burning your fingers.
Mix rice vinegar and sugar in a small microwave-safe bowl. Zap it for 30 seconds until the sugar dissolves completely. Pour this mixture over your warm rice and fold gently with a wooden spoon or rice paddle. The rice should look glossy and smell slightly sweet and tangy. Set this aside while you deal with the salmon.
Cut your salmon into bite-sized cubes, about half an inch each. Toss them in a bowl with soy sauce, kewpie mayo, sriracha, and sesame oil. Mix until every piece gets coated in that creamy, spicy goodness. The salmon should look pink and glossy, ready to transform in the oven.
Preheat your oven to 400 degrees Fahrenheit. Take your nori sheets and cut each one into four equal squares. They should be big enough to line a muffin cup with some overhang. Spray your muffin tin lightly with cooking spray so nothing sticks later.
Press one nori square into each muffin cup, letting the corners stick up a bit. Spoon about two tablespoons of seasoned sushi rice into each cup and press it down firmly with the back of your spoon or your fingers. You want a solid base that will not fall apart when you try to eat these later.
Top each rice layer with a generous spoonful of the salmon mixture, maybe a tablespoon and a half. Do not skimp here because the salmon is the star. Make sure it covers the rice evenly so every bite gets that flavor.
Slide the muffin tin into your preheated oven and bake for 15 minutes. The salmon should cook through and the edges might get slightly golden and crispy. Your kitchen will smell incredible at this point. Let them cool in the tin for about two minutes before trying to remove them, otherwise they might crumble.
Pro Tips for Success
Press the rice firmly but not so hard you smash it into mush. You want it compact enough to hold together but still fluffy enough to taste good. Think of it like packing a snowball, firm but not crushed.
- Use day-old rice if you have it, freshly cooked rice is too sticky and moist
- Cut the nori with kitchen scissors instead of tearing for cleaner edges
- Spray your fingers with cooking spray when pressing down the rice to prevent sticking
- Let the cups cool slightly before removing from the tin, they firm up as they cool
- Save any leftover salmon mixture to make a quick poke bowl later
Creative Variations to Try
Swap salmon for diced tuna, cooked shrimp, or even imitation crab if you prefer. The cooking method stays the same regardless of protein. Just make sure everything is cut into similar-sized pieces so it cooks evenly.
- Add cream cheese cubes on top of the rice for a Philadelphia roll vibe
- Mix diced cucumber and avocado into the salmon mixture for extra freshness
- Use spicy mayo made with regular mayo and sriracha if you cannot find kewpie
- Try brown rice instead of white for more fiber and nuttiness
- Top with masago or tobiko for that signature sushi roe crunch
- Drizzle with eel sauce after baking for sweet umami flavor
Troubleshooting Common Problems
If your cups fall apart when you try to remove them, you probably did not press the rice down enough. Next time, pack it more firmly and let them cool longer before popping them out. A butter knife run around the edges helps too.
- Dry salmon means you baked too long, reduce time to 12 minutes and check
- Soggy nori happens when rice is too wet, make sure rice cools and steam escapes before assembly
- Cups stuck to tin despite spray, line bottoms with small parchment circles
- Rice tastes bland even with vinegar mixture, add a pinch of salt to the rice while cooking
- Salmon mixture too spicy, reduce sriracha to half a tablespoon and add more mayo
Smart Ingredient Swaps
No sushi rice? Short-grain white rice or even jasmine rice work in a pinch, though the texture will not be as sticky. You want rice that clumps together naturally rather than staying separate and fluffy like basmati.
- Regular mayo works if you add a tiny squeeze of lemon juice for brightness
- Apple cider vinegar can replace rice vinegar in the seasoning mixture
- Honey substitutes for sugar if you want natural sweetness
- Seaweed snacks from the grocery store can replace nori sheets
- Smoked salmon instead of fresh gives a different but delicious flavor
- Tamari or coconut aminos replace soy sauce for gluten-free versions
Storage and Meal Prep
These Salmon Sushi Cups taste best fresh from the oven when the nori still has some crispness. However, you can store leftovers in an airtight container in the fridge for up to two days. The nori will soften considerably, but they still taste good.
To reheat, pop them in a 350-degree oven for about 8 minutes rather than using the microwave. This helps restore some of the texture. The microwave makes them rubbery and sad. You can also eat them cold straight from the fridge if you are in a hurry.
For meal prep, assemble the cups in the muffin tin, cover tightly with plastic wrap, and refrigerate unbaked for up to one day. When ready to eat, bake straight from the fridge, adding an extra 3 to 5 minutes to the cooking time since they start cold. This makes them perfect for entertaining since you can prep ahead and just bake when guests arrive.
Serving Ideas
Arrange these Salmon Sushi Cups on a platter with small dishes of soy sauce, pickled ginger, and wasabi for a complete sushi experience. They look impressive at parties and everyone loves the individual portions.
- Serve alongside miso soup and edamame for a Japanese-inspired meal
- Pair with cucumber salad dressed in rice vinegar for freshness
- Make a platter with different proteins in separate batches for variety
- Offer them as passed appetizers at cocktail parties with napkins
- Pack for lunch with chopsticks and a small container of extra sauce
Frequently Asked Questions
Can I make Salmon Sushi Cups with cooked salmon?
Yes, leftover cooked salmon works great here. Skip the baking step and just assemble the cups with cold cooked salmon mixed with the mayo and sauces. This turns them into more traditional cold sushi bites without any oven time needed.
Do Salmon Sushi Cups need to be refrigerated?
Absolutely. Raw or cooked fish should not sit at room temperature for more than two hours. Store leftovers in the fridge within that window and eat within two days for food safety.
Can I freeze these sushi cups for later?
Freezing is not recommended because the rice gets hard and the nori turns completely soggy when thawed. The texture suffers too much. These are best made fresh or stored refrigerated for short-term use only.
What is the best salmon to use for Salmon Sushi Cups?
Use sushi-grade salmon if you plan to serve these rare or medium-rare in the center. For fully cooked versions like this recipe, regular fresh salmon from the grocery store works perfectly fine. Look for bright pink color and no fishy smell.
How do I keep the nori from getting soggy?
Make sure your rice is not steaming hot when you assemble the cups. Let it cool to room temperature first. Also, press the rice firmly to remove excess moisture. Baking helps crisp the edges of the nori too.
Are Salmon Sushi Cups gluten-free?
They can be if you use gluten-free soy sauce or tamari. Regular soy sauce contains wheat. Check your Kewpie Mayo label too, though most brands are gluten-free. Everything else in the recipe is naturally gluten-free.
Can kids help make these sushi cups?
Definitely. Kids love pressing the rice into the muffin cups and spooning on the salmon mixture. Just handle the raw fish yourself and let them do the assembly part. They will feel so proud serving something they helped create.
Salmon Sushi Cups
Ingredients
Equipment
Method
- Cook sushi rice according to package directions. Once cooked, transfer to a large bowl and let cool slightly.
- In a small microwave-safe bowl, combine rice vinegar and sugar. Microwave for 30 seconds until sugar dissolves completely.
- Pour the vinegar mixture over the warm rice and fold gently with a wooden spoon. The rice should look glossy and smell slightly sweet. Set aside.
- Preheat oven to 400°F.
- In a bowl, combine cubed salmon, soy sauce, kewpie mayo, sriracha, and sesame oil. Mix until every piece is well coated. Set aside.
- Cut each nori sheet into 4 equal squares using kitchen scissors. Spray a 12-cup muffin tin lightly with cooking spray.
- Press one nori square into each muffin cup, letting corners stick up. Spoon about 2 tablespoons of seasoned rice into each cup and press down firmly with the back of a spoon.
- Top each rice layer with a generous spoonful (about 1.5 tablespoons) of the salmon mixture, spreading evenly to cover the rice.
- Bake in preheated oven for 15 minutes, or until salmon is cooked through and edges are slightly golden.
- Let cool in the tin for 2 minutes. Carefully remove cups and drizzle with extra sriracha and mayo. Garnish with furikake and green onions. Serve immediately.
Notes
- Use sushi-grade salmon if you prefer the centers slightly rare. Regular fresh salmon works for fully cooked versions.
- Day-old rice works better than freshly cooked rice as it is less sticky and holds shape better.
- Press rice firmly into muffin cups to ensure they hold together when removed.
- Let cups cool for at least 2 minutes before removing to prevent crumbling.
- Store leftovers in an airtight container in the refrigerator for up to 2 days.
- Reheat in a 350°F oven for 8 minutes rather than microwave to restore texture.
- For make-ahead, assemble unbaked cups, cover with plastic wrap, and refrigerate up to 1 day. Bake when ready, adding 3-5 extra minutes.